How to build your own computer
I decided to teach everybody howto build his own computer because
it is much less expensive to build one than to buy one.I build mine some time
ago (September 1997) for $750 and the cheapest I found alreadybuild was $1100
- $1200 or more. This computer was a P133 with 16M of RAM, sound card 16b,speakers
with microphone, 33.6K Diamond modem, 1.7G hard drive, mouse, keyboard, minitower
case.
Here
is how a motherboard looks: 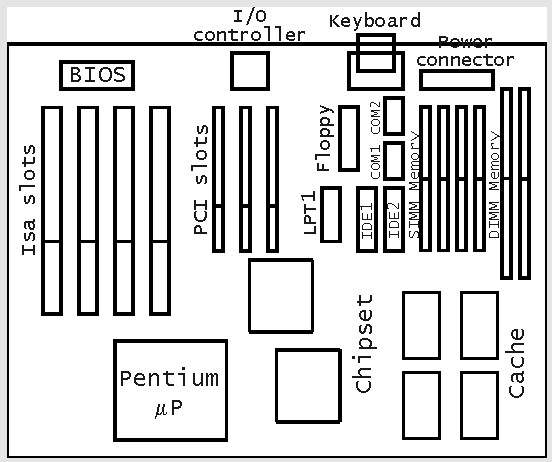
Beforestarting to tell you a little bit about what you see on the motherboard
let me point youto the greatest computer hardware page on Internet: Tom's
hardware page. In this page you will find
REALLY good information about the hardwareinside your computer. You could find
there information about bus speed, EDO memory, BEDOmemory, SDRAM memory, chip
set characteristics, parallel port modes and many more. Gothere and see for
yourself how complete is that page.
Now about what you see onthe
motherboard:
- The pentium socket - is the socket in which
you insert your pentium microprocessor. Align the point on the microprocessor with the
corresponding corner on the socket (you will see only one corner is different from the
others). The microprocessor fits in the socket only in one position, unless you are strong
... : - )
- The chip set - is the 4 chips who take care
of your hardware. Don't be scared about it, you don't have to do nothing about it.
- The CACHE memory - is a fast memory who
keep the last used instructions and data and it is accessed by the microprocessor always
before the normal RAM memory. Sometime this is called also external cache because the
microprocessor has also a internal cache. Now most of the motherboards have 512K - 1M of
cache.
- The ISA slots - in those slots you plug all
your ISA cards like sound cards, modem cards, network cards, GPIB cards, data acquisition
cards, etc.
- The PCI slots - in those slots you plug the
PCI cards like video card, eventually network cards.
- The BIOS - is a FLASH memory or a EPROM
memory where the board manufacturer is putting a program called bios which control by low
level functions all your hardware. The operating system call bios functions to access the
hardware.
- The I/O controller - is actually a
microprocessor who control the I/O ports.
- The IDE connector - in this connector you
have to plug the flat cable from the HDD and / or the cable from the CD-Rom.
- The floppy connector - is the connector where you plug the cable from
the floppy disk drive.
- LPT1, COM1, COM2 - those are the places
where you plug the cables from your parallel port, and serial ports.
- SIMM memory - this is where you insert the
SIMM memory modules. Keep in mind that your pentium processor will work only if you will
have a bank full of memory so for example if you want to install 32M of memory you could
put 2 modules of 16M or 4 modules of 8M but never 1 module of 32M of SIMM memory.
- DIMM memory - this is where you will plug
the DIMM memory modules. You could plug only one of those modules. Keep in mind that if
you have EDO DIMM memory you have to set up the power for the DIMM at 5 volts and if you
use SDRAM memory you have to set up the power for the DIMM at 3.3 volts.
- Power connector - there is where you plug
the two cables from the power supply inside your case. The two plugs you have to plug on
the motherboard are different from the others. Another thing to keep in mind is to put the
black wires in the middle.
- The keyboard connector - is where you plug
your keyboard after all is in place.
Now how you mount the parts.
- Open the case and take the metal bottom out by unscrewing
the two screws.
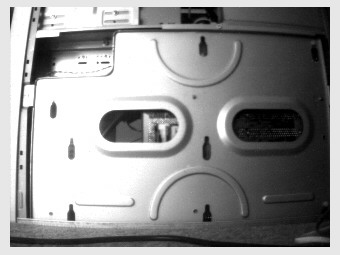 |
This is the back you have to take out |
- Insert the plastic legs in the holes of the motherboard
and place the motherboard on the metal back and fix it with some screws.
- Insert the microprocessor in the socket. To do this you
have to pull the lock bar and to put the microprocessor in place. Close now
the socket with the lock bar.
- Now set up the jumpers on the motherboard. You could find
the settings on the motherboard booklet.
Here are some few rules:
- 1 Set up the CPU voltage. THAT is VERY important. You
could fry your CPU if you don't set up the right voltage. A basic rule if you know nothing
about the CPU is to set up the smallest voltage and to see if it is working and to
graduate increase the voltage. If you see the speed of the CPU set up the voltage based on
the next table.
CPU Type - INTEL |
Speed |
Multiply / BUS clock |
Voltage |
Pentium |
75 MHz |
X1.5 / 50 |
3.3V |
Pentium |
90 MHz |
X1.5 / 60 |
3.3V |
Pentium |
100 MHz |
X1.5 / 66 |
3.3V |
Pentium |
120 MHz |
X1.5 / 60 |
3.3V |
Pentium |
133 MHz |
X1.5 / 66 |
3.3V |
Pentium |
150 MHz |
X1.5 / 60 |
3.3V |
Pentium |
180 MHz |
X1.5 / 60 |
3.3V |
Pentium / MMX |
166 MHz |
X1.5 / 66 |
2.8V |
Pentium / MMX |
200 MHz |
X1.5 / 66 |
2.8V |
Pentium / MMX |
233 MHz |
X1.5 / 66 |
2.8V |
CPU Type - CYRIX |
Speed |
Multiply / BUS clock |
Voltage |
6x86 |
100 MHz - PR120+ |
X2 / 50 |
3.3V |
6x86 |
110 MHz - PR133+ |
X2 / 55 |
3.3V / 3.52V |
6x86 |
120 MHz - PR150+ |
X2 / 60 |
3.3V / 3.52V |
6x86 |
133 MHz - PR166+ |
X2 / 66 |
3.3V / 3.52V |
6x86 |
166 MHz - PR200+ |
X2 / 75 |
3.3V / 3.52V |
6x86L |
110 MHz - PR133+ |
X2 / 55 |
2.8V |
6x86L |
120 MHz - PR150+ |
X2 / 60 |
2.8V |
6x86L |
133 MHz - PR166+ |
X2 / 66 |
2.8V |
6x86L |
166 MHz - PR200+ |
X2 / 75 |
2.8V |
6x86 MX |
150 MHz - PR166+ |
X2.5 / 60 |
2.9V |
6x86 MX |
133 MHz - PR166+ |
X2 / 66 |
2.9V |
CPU Type - AMD |
Speed |
Multiply / BUS clock |
Voltage |
K5 |
100 MHz - PR100 |
X1.5 / 66 |
3.3V |
K5 |
120 MHz - PR120 |
X2 / 60 |
3.3V |
K5 |
133 MHz - PR133 |
X2 / 66 |
3.52V |
K5 |
150 MHz - PR150 |
X2.5 / 60 |
3.52V |
K5 |
166 MHz - PR166 |
X2.5 / 66 |
3.52V |
K6 |
166 MHz - PR2-166 |
X2.5 / 66 |
2.9V |
K6 |
200 MHz - PR2-200 |
X3 / 66 |
2.9V |
K6 |
233 MHz - PR2-233 |
X3.5/ 66 |
3.2V |
- 2 Set up the DIMM memory voltage if you have
any. The settings for the DIMM memory are in the next table
| Memory type in the DIMM socket |
Voltage |
| EDO memory |
5V |
| SDRAM memory |
3.3V |
If you will pay 20-40dollars
more you could get a jumper less motherboard. They are OK but it is no differencebetween a
jumper less and a normal one except for the jumper setting. So if you are lazyand you have
enough money buy a jumper less motherboard.
- Put back the bottom of the case with the board in place. Screw the 2 - 4
screw in place and turn the computer with the open part up. You will see the image who is
in this page background without cables and perpendicular boards.
- Now insert the perpendicular boards you have. I'll suggest first to plug
the video card and turn on the computer. If something is not working check first if the
fan of the microprocessor is working. If is working, then turn on your monitor : - ). If
is not working check to see if you plugged correctly the power on the motherboard. If it
"still doesn't answer" call a friend who already did that before.
- Plug the power in each of your peripheral devices: hard drives, floppy
drive, CD-ROM drive. The plugs are "anti stupid" so you could plug them only in
one position. .... Except if you are strong enough. I've seen a hard drive where somebody
plugged the power backwards .... and it was not nice.
- Plug the flat cable in each of pheripherals. Keep in mind that the red
wire on the flat cable should be plugged to correspond with the pin 1 of the device. If
the pins are not numbered the almost generic rule is that the red wire of the power cable
should face the red wire of the flat cable. The floppy cable: plug the twisted cable in
the drive you want to be A drive.
- If you want more than one device on a big flat cable (called IDE cable)
than you have to set up a device like master and the other one like slave. You do that by
the jumpers you will find on the back of the hard drive or the CD-ROM drive. You will see
the settings for those jumpers on the CD-ROM case or the hard drive case.
- Plug now the other end of the flat cables on the motherboard. The IDE
cables in the IDE connectors and the floppy cable in the floppy connector. Use the same
rule: plug the pin one of the cable (red wire) facing the pin one of the connector
(usually marked with a arrow or numbered or numbered in the motherboard book). Don't panic
if something is not working, just turn the cable.
- Remove the metal tabs from behind the computer in the places you want to
put the boards.

- Now plug all the cards you want to put in: modem, sound card, network
card.
- Plug now the 3 wire cable between the CD-ROM and your sound card.
Now you are ready to go so plug the cable in the outlet
andturn on your computer. I hope is working. Now you gave to enter n the BIOS and
toconfigure the hard drive you are using. To do that go in the bios by pressing the DEL
key(for AWARD bios and AMI bios) or any other key indicating to let you in the
biosconfiguration. Go to IDE auto detection and press auto detect. After the bios is
autodetecting your hard drive go out from the bios and save the configuration.
Insert now a dos boot diskette which have also fdisk.exe,sys.com
and format.com. The system will boot from the floppy. Enter now inthe fdisk
utility to create a partition on your hard drive. Go to create new partition-> primary
dos partition. Follow the indications and when the partition is createdreboot your
computer. Your computer will boot from floppy again but now you will see thedrive C too
whithout being able to access it. Format now your disk C with the command:format c: /u/s.
After a few minutes your hard drive will be formatted and bootable.
The rest is on you: install the software and enjoy.
Where to buy parts?
Here are some supplyers and some web sites from where you could
findthe best deals on computer parts.
Intrexcomputers
Computercustom
sollutions
CPUmicromart
Spartantechnologies
A pro computers
Some "don't"
Since I had a lot of hits I decided to update and to maintain
thispage so check it periodically for updates.
In this paragraph I write about some things what
youshould NOT do.
- Don't ever buy a ADDONICS Sound Vision sound card. It not support
streaming audio. In other words it not recognize the sampling rate of your internet
sounds. Iou will not be able to use it with NetMeeting or .au files downloaded from
internet. The funny part of this is that the guys from Sound Vision have some FAQ and one
of them is :" Is the SoundVision sound card compatible with NetMeeting
software". Guess the answer from the SoundVision guys: quote "NO". No
explanation no nothing. Nice job isn't it?
- Don't ever buy a IBM Aptiva box. The guys from Aptiva put almost
everything on the motherboard: the video card is integrated on the motherboard and the
motherboard has strange connectors and power cords everywhere. You could find for example
(that's for real, I found this in a Aptiva box): 1 meg trident card integrated on the
motherboard, modem-sonnd card combo. I could not reuse even the box. They put in the
Aptiva (I opened only Aptiva 100 boxes) 150-200W power supply so not quite usable with a
lot of boards. To give you a example, usually you could keep from a pentium box which you
want to upgrade almost everything except the microprocessor. From the Aptiva boxes I kept
... the floppy drive, the HDD, the keyboard, the monitor and some memory.
- I will not suggest you to buy a computer from a non specialized company
like user electronics companies. I tried to install a ISA network card in a K6 box for 3
times 3 hours and I still not working
- Don't try to put a "old" serial cable (the cable inside the
computer between the MB and the actual serial plug) in a new computer. They are
incompatible. So if you have a 486 and you will upgrade this at a pentium don't be
surprised if you will use the old serial cable and your mouse will not work, just change
the cable.
- Don't EVER try to install a Iomega Ditto external tape drive on a W95
box. I failed REALLY badly a couple of times and I had to delete windows and to reinstall
it. If you really want that Ditto drive on your computer try to install it first.
You are visitor  from 29 March 1998
The pictures in this page where created with the Connectix
Quickcam B&W. The settings are taken from some motherboards books. The rest
is all my creation. I will not be held responsiblefor any hardware damage. Use
my instructions at your own risk.
Back
Updated
April 30, 2008 0:37 AM
by Vlad Pambucol